Home ♥ ♥ Facebook

Thursday, April 26, 2012

Theme Day Thursday - Beach


Hi Everyone! Today is Theme Day Thursday! Today the Design Team had to create something with a beach theme.


Today, I stepped outside of my box. I decided that I wanted to do something other than cards for projects. Today I completed my first two page scrapbook layout! I'm so excited to have stepped outside of my comfort zone. I'm also excited because I really like the way it looks! 


I used the Life is a Beach cartridge. To create the sand, I used cream card stock and sprayed it with Glimmer Mist in Sugar Maple. I cut out the sand castle, crab, beach ball and sun at three inches. I used the font from this cartridge to cut out "Sunny Days" at three inches as well. It's a little hard to see, but I did ink the edges of the letters. 


The sun was cut out in yellow. I then took an orange Copic Marker and colored it. Once it dried, I used Stickles in Stardust on the sun rays to make the sun more seem a little more "sunny". 


I cut out some other beach accessories at two inches. The flip flops, the sand dollar, and the bucket of sand. 


I also used Stickles on the beach ball to make look as though it were a little wet from being near the water. 


I am very proud of this layout! My nephew loves going to the beach (as do I) and I have pictures of us just having a fun "sunny day" in the sand and water. Please go to Erica's Craft Room to see more projects from the Design Team.

I hope I have inspired you to become more crafty!
~Tiffany~


Thursday, April 19, 2012

Theme Day Thursday - Vacation


Hi everyone! Today is Theme Day Thursday. Today the Design Team had to create something related to vacation. I remembered when I was a little girl watching Looney Tunes when Bugs Bunny or Yosemite Sam traveled, their suitcases always had the names of the places where they had traveled. So I decided to create this "vacationing" suitcase. 


I used Plantin Schoolbook to cut out this cute 3D bag. I cut it out at 12 1/2 inches using the fit to page feature. I cut out four different shapes from the Art Philosophy cartridge. (If you would like to purchase the Art Philosophy cartridge, you can get it HERE). I used my white gel pen to create the faux stitching on the suitcase. I used my Gypsy to weld the letters together. I used the Art Philosophy font for the names of the places visited. On this side of the suitcase, you can see that the "owner" has traveled to Paris and Rio. 


On this side side, the owner has traveled to New York and Miami.


I used liquid pearls on the New York tag to recreate the bright lights of Times Square and gel pens on the Miami tag. 


I used my Sizzix Texture Boutique to emboss the Rio tag. I also inked the edges. I used a gel pen for the faux stitching around the Paris tag. 

I had a lot of fun creating this little suitcase. Hopefully it gets filled with lots of fun souvenirs! Head to Erica's Craft Room to see what the other team members have created.


I hope I have inspired you to become more crafty! 
~Tiffany~ 


Wednesday, April 18, 2012

Arbor Day Blog Hop


I think that I shall never see
A poem lovely as a tree.
A tree whose hungry mouth is prest
Against the earth's sweet flowing breast;
A tree that looks at God all day,
And lifts her leafy arms to pray;
A tree that may in Summer wear
A nest of robins in her hair;
Upon whose bosom snow has lain;
Who intimately lives with rain.
Poems are made by fools like me,
But only God can make a tree.
...Alfred Joyce Kilma

In the News: Arbor Day celebrated in Clarksville, 'Tree City USA' as quoted in their local paper
"I have a saying that trees are one of our utilities, and the reason I say that is because they help clean the air, they help control rainwater runoff, they convert carbon dioxide into oxygen," he said. "What we really have when we have a line of trees around the city is a utility that provides good things for the population without having any cost associated with it."

Today, we are celebrating the wonderment of trees and we welcome you in our celebration. If you are just visiting me, I would love for you to have a good "roots" with our hop and start at the beginning of our seedling which is at. If you have arrived from                                     then don't "bark" up the wrong tree as you are standing in our midst!


Now for my project...

I've been reading over the years that there has been a serious decline in the bee population. Bees are extremely important, especially in regards to our food chain. Without bees, many of the foods that we depend upon will no longer exist. So, I decided to create this frame called "Trees need bees".
I took a regular frame and covered it with paper from Close to My Heart using modge podge. This paper comes from the Mayberry paper pack. The bees and trees come from the Create a Critter cartridge.  I cut out two bees, the shadow and the layers at 2 3/4 inches. I also cut out three trees. The two smaller trees are cut at 2 3/4 inches. The larger tree is cut out at 3 1/4 inches. 


I used Stickles on the wings of the bee. The color of the Stickes is waterfall. 


I welded the phrase "Trees need bees" on my cricut gypsy. The top font is from Art Philosophy Cartridge from Close to My Heart. The "bees" is from Gypsy font. If you want to purchase the Art Philosophy cartridge, you can purchase it HERE. I used a white gel pen to create the faux stitching. 


I also used liquid pearls so the trees would look as though they were bearing fruit (thanks to the bees).


Thank you for visiting us today as we celebrate the loveliness of our trees. Your next stop along our trail is  Lori ~ http://scrappinmystressaway.blogspot.com/Thank you for counting our rings and not stumping along the way!


Tuesday, April 17, 2012

National Scrapbooking Day - AWESOME GIVEAWAY!!!!!

Hi Everyone! 


I just came across an awesome giveaway that is going on right now! ♥
Please, please, please go to this BLOG to see how you can win extraordinarily AWESOME prizes! Some of the prizes include a Tim Holtz Vagabond, Pink Sizzix Sidekick or scrap booking kits! You have more than once chance to earn an entry, so visit now to see how you can win one of these fabulous prizes! ♥


Thursday, April 12, 2012

How to load your ATG easily!

Hi everyone! I've had a few people say that they have trouble loading their ATG's when the tape runs out. The most common complaint is that the refill is put in upside down. Well, I will admit that my first time trying to refill this thing was a headache. But by the third time, I discovered a way to refill the ATG without losing my mind! ♥


Okay, let's go back for a minute. For anyone that is new to the paper crafting world, an ATG is an advanced tape glider. There are many brands on the market. Here are a few that are available. 


I imagine some ATG's are better than others. However, I purchased the pink one by 3M because the proceeds go to the Susan G. Komen foundation. That is the one I am going to show you how to refill with ease! Now my ATG is already filled so I'm going to show you how to refill on top of the adhesive that is already inside! 


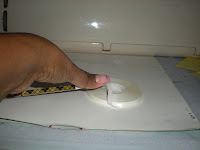
Push gently on this button. This will raise the flap. 


When it is opened it will look like this...


You are going to see two circular parts. One on the left & one on the right with a plastic dial. 


The dial on the left is where the tape will be placed. The dial on the right is where the tape will wind. 


Now you have your tape. It will look like this...

Here is where people usually have a problem...putting the adhesive in correctly. If you don't put the adhesive in the right way, it won't come out at all and will leave a mess. So this is what I do when I am going to refill the ATG. I unroll it until it gets to the sticky part like this...

Then I hold it in between my forefinger and thumb. Now here is my trick. The sticky feel test, LOL!  If you feel the adhesive on your forefinger, you have the tape upside down. Flip it over and try again. If you feel the adhesive on your thumb like in the picture below, then you have the tape facing the right way and you can put it on the left dial.

After you have placed the tape on the left dial, press down until you hear a little click. The tape that you have unwound gets wound around the orange roller like in the picture below.

You wrap the adhesive around in a "up the hill, down the hill" fashion (forgive me, but that is the Pre-K Teacher in me speaking, LOL). That means you put the tape on top of the first roller then bring it down and around the second roller. The excess will wrap over the tape itself and reach over to the second dial.

Wrap the tape around this dial. Snake the tape through the two slits and press the sticky end on the dial. That will keep the tape in place when it winds. It will look like this when it is wound correctly.


Close the flap and then you are ready to use your ATG! If you have any additional questions, or need more clarity, please feel free to leave a message and a way to get back to you!

Thanks for stopping by!
~Tiffany~


Wednesday, April 11, 2012

Wet Techniques


Hello Everyone! Today is Wednesday and today the design team had the challenge of creating using wet techniques. I love using craft tags to make bookmarks so I decided to use some of my favorite items to create a quick and simple bookmark.


I took an ordinary white craft tag like the one below.


Next, I sprayed the tag with different colors of Glimmer Mist. The colors I used were Graphite, Pomegranate and Caribbean Blue.


I used my heat embossing tool to dry the tag so I wouldn't have to wait too long for the tag to dry.


I then embellished the tag using stickles and liquid pearls. The butterfly was traced with silver stickles. I added the swirl with silver stickles as well. The flower at the top left has a small dab of white opal liquid pearls in the center. 

Please go to Erica's Craft Room to see projects from the other team members!

I hope I have inspired you to become crafty!

~Tiffany~


Friday, April 6, 2012

100 Cricut Cartridge Blog Hop - April


I hope you all are having fun with the hop! Here are my projects for this weekend's hop!


My first project I used Celebrate with Flourish. I created this invitation for someone who wanted to do something nice for her husband. I cut the wine bottle and the layers at 3 inches. I colored the glasses and added the wine using my Copic markers.  The "You're Invited" is from Potpourri Basket.

♥ ♥ ♥ ♥ ♥ ♥ ♥ ♥ ♥ ♥

My second project was originally going to be a scrapbook layout. However, I just couldn't get it to look the way I wanted, So I opted to make this an invitation for a party. 


I cut the "wizard", the layers, and the fairy tale sentiment at 2 1/2 inches.  I used gold stickles on the crown, the wand, and wizard hat to add some dimension. I colored everything with my Copic Markers. 


♥ ♥ ♥ ♥ ♥ ♥ ♥ ♥ ♥ ♥  

My third and final project is a treat bag I made using the Art Philosophy cartridge.


 I cut the bag at 12 1/2 inches using the fit to page feature. After assembling the treat bag, I adhered eggs to the treat bag, which also are on the Art Philosophy cart. The eggs were all cut at two inches and decorated with liquid pearls. (If you want to purchase the Art Philosophy Cartridge, you can purchase it HERE).

I hope that I have inspired you to become more creative! Please visit next Teresa @ 
http://createenjoyshare.blogspot.com/

WINNERS from the Little Prince Blog Hop!

Here are the winners for the Little Prince Blog Hop!!!! The winner of the Mary Kay bath set is... Teresa K!!!!! The winner of the Close to My Heart paper & stamp set is... Wandeezy!!!!! CONGRATULATIONS to BOTH of the WINNERS!!!!! Please send me your mailing address so you may receive your goodies! Thank you to everyone who participated and made this blog hop a HUGE success! Stay tuned for more blog hops and great prizes VERY SOON! ♥

Thursday, April 5, 2012

Ginger Snap Scraps - Grand opening

Please join us tomorrow for the Ginger Snap Scraps Grand Opening event on Facebook!  There will be prizes given away each hour beginning at 10 AM.  You must join the event and be present to comment on each prize to win them.  The winner of the grand prize Teen Scene Cricut cartridge will be drawn at 8 PM.  
To join the Facebook event, click here
Ginger Snap Scraps is a brand new, on-line scrapbook store run by stay at home mom, Cori Wagner.  The store has many popular brands such as Cricut, Copic, My Mind's Eye, Echo Park, Peachy Keen and many more of your favorites! You can shop the store now by going to www.gingersnapscraps.com
There will be free shipping on all $25 orders through Sunday to celebrate the stores opening!
Regular shipping at Ginger Snap Scraps is $5 flat rate shipping to the US and $10 flat rate shipping to Canada.  Shipping to military bases is always free, as a thank you for your service to our country.
We hope you will come by the event and enjoy some great give aways and fun!
.

Theme Day Thursday - Cruise


Hi everyone! Today is Theme Day Thursday! Today the design team had to create something with a cruise theme! 


I created this Bon Voyage card using Life is a Beach and Plantin Schoolbook. The sentiment Bon Voyage was welded together from Plantin Schoolbook using my Gypsy and cut at two inches high. The waves and the cruise ship both come from Life is a Beach. The waves were cut at 1 1/2 inches. I cut the waves twice to add some dimension. The cruise ship and it's layers were cut at two inches. I colored the waves, the smoke from the smokestack and the ship using my copic markers. I used white opal liquid pearls as a dimensional element along the ship. I used foam dots to affix the ship and the waves to the card.  I had fun creating this card! 


Please visit Erica's Craft Room to see what the other design team members have created today!


I hope I have inspired you to become crafty!


~Tiffany~

Sunday, April 1, 2012

Little Prince Blog Hop - Day 2


Little Prince Blog Hop - Day 2

Homespun Elegance Prince Blog Hop


Good morning everyone, and Welcome to the Little Prince Blog Hop - Day 2!! I am so excited to be hosting my first ever Blog Hop, and have some VERY creative friends who will be sharing some fabulous creations for the little Prince's in their lives!  I hope that you all have a fabulous time! Please leave some Blogger Love on their designs that they have worked so hard on! :)  

Each stop along the way has fun and exciting giveaways to share with you all! To be entered all you need to do is Hop Today, follow and leave a comment! 

Now, on to my projects for Today!

=======================================================


Hi everyone! Today is Day 2 of the Little Prince blog hop! I am co-hosting this blog hop with my friend Jessica

You should have started at Jessica's blog. If you haven't, please click her name to begin at the beginning. There's LOTS of blog candy at EVERY STOP during this hop and you don't want to miss out on anything!
Here is the line up for the blog hop! 


During this hop you will see many types of Home Decor projects for boys (or the little Prince's in our lives). Here is my project for today. 


Materials needed:
Unfinished mini bird feeder
foam brushes
printed card stock
modge podge
ribbon


I chose the decorative mini feeder because my nephew loves birds (rather he loves to either chase them in the park or feed them, lol). So I figured he would enjoy having a bird feeder to hang outside his window. 


I took some card stock that had a boy-ish theme, measured the edges and top and modge podged the paper onto the feeder. I think my nephew is going enjoy hanging this outside his window! ♥


Now for the fun part! Giveaway time!!!
You have an opportunity to win:

A: Close to My Heart pack with Mini stamp set 


OR 

B: Mary Kay bath set which includes Bodywash, lotion &  loofah.

March 31 & April 1 Little Prince Blog Hop Candi

In order for you to have a chance to win you MUST:

1. Become a follower of my blog!
2. Leave a comment stating that you have become a follower.
3. Share this with your friends: Facebook, Twitter, etc.
4. Leave a comment on your blog WITH A LINK back to this post.
5. Visit EVERY blog in this hop AND become a follower! There aren't twenty blogs that you have to visit, so this part should be easy! 
TWO winners will be selected by RANDOM NUMBER GENERATOR from RANDOM.ORG by Friday, April 6th
PLEASE go to Laurie Mince @ http://mincedpaper.blogspot.com/blog next!