Home ♥ ♥ Facebook
Showing posts with label ribbon. Show all posts

Wednesday, August 21, 2013

Altered clipboard ♥

Hi everyone!

Well, the summer is winding down. Beach weather is almost gone...I'm not ready to give up my flip flops and shorts yet, lol!

Any way, I've been preparing for the past few weeks to go back to school. In an effort to stay organized when I am collecting anecdotes about my students, I decided to try something different. In the past, I would use a notebook to collect anecdotes. However, more often than not, I would put the notebook down somewhere and forget where I would last place it. Also, I would put my pen down and not be able to locate it for a while.

I decided this year I would us a clipboard and have several areas in the room with a little hook designated for the clipboard. This way, I could hang it in more than one place and still keep a track of it. I also decided to alter the clipboard in some bright cheery colors so I could easily spot it in my classroom.

Here it is!!


I first painted the edges of the clipboard black. I used three sheets of card stock from Die Cuts with a View (DCWV) from the Grade School Stack. I only had the 8 x 8 pad available because I was unable to find the 12 x 12 stack. That is why I wound up painting the border black. After the paint dried, I sealed it with a layer of mod podge. I also painted the entire back of the clipboard black and put a layer of mod podge on top of that as well.

After the  mod podge dried, I cut two strips of the card stock from two of the three sheets. I cut them at 2 3/4 x 8. The apple pattern and the top and the diamond patter at the bottom are the strips I cut. The middle sheet with all the stripes is a full sheet. I layered the apple sheet and the diamond sheet on top and adhered everything with mod podge. Once the sheets dried, I put a thin layer of mod podge to seal everything.

I took four ribbon and cut them in half, then threaded the ribbon through the hole at the top. I hot glued some buttons on the top of the board. To keep my pens in place, I covered two binder clips with some of the leftover paper using my ATG gun for the adhesive.

I hope you like it! I am working on some other projects for use in my classroom. Stay tuned for more projects...coming soon!!! ♥
Friday, November 30, 2012

Close to My Heart December Blog Hop - Pear and Partridge

Hi all!

Welcome to the Damask Divas December Blog Hop!


If you've just come from Melissa Thompson then you are on the right track. If you haven't, please start at the beginning of the hop with our team leader Mandy Leahy

This month the team is focusing on the Pear and Partridge paper pack exclusive to Close to My Heart. 


Here are some projects that I have created using this wonderful paper pack and using the Cricut cartridges Artiste and Art Philosophy. 


The ornament on this card comes from the Art Philosophy cartridge...


I used a square punch on strips of paper to create banners. The glittered letters are glittered thickers...


I used the tree cut on page 56 of the book from the Artiste cartridge. The ornaments were hand decorated by me! 


I cut this hexagon box at 3 1/4 inches. It is also from the Artiste cartridge. The ribbon came from Michael's. Inside this lovely box is one of the above ornaments that I will be giving as gifts.

I hope that you have enjoyed my projects! ♥

Next you should visit Ashley. Happy Hopping!

If you want to purchase any of this beautiful paper, you can purchase it HERE!

Monday, October 1, 2012

A Homespun Affair - October 2012 Edition


Hello!!!! It's the October edition of A Homespun Affair and this month we are bringing you projects for a Halloween!!! I'm not as big a fan of Halloween as I was as a child, but I do like to see the little ones dressed in their costumes (and of course the chocolates, lol)! For this edition, I focused more on the projects rather than a tutorial.

For the rosettes I used the Artiste cartridge. You need two cuts for one rosette. For this banner I cut 16 at 2 1/2 inches. Fold them like an accordion and adhere both ends together.
The medallion is cut at 3 1/2 inches from the Artiste cartridge. The word "Spooky" was cut from the Blackletter cartridge at 3 1/4 inches.
I punched holes at opposite ends of the rosettes and strung ribbon through. The stamped images are from the Wicked set and I colored the witch lightly with chalk. I used Stickles on the letters for a little shimmer. 


The treat bag was cut at 5 1/4 inches from the Artiste cartridge. The scallop was cut at 3 inches from the Art Philosophy cartridge. I stamped and cut the stamps from the Wicked stamp set. This bag is large enough to fit some yummy treats inside!!! 


I hope you have enjoyed these projects!!! 

Monday, July 2, 2012

A Homespun Affair - July Issue


So have you been following along! Today is the release of our second edition of our magazine A Homespun Affair. We have been working VERY hard to bring you some awesome designers, projects and tutorials! 

Here's the latest edition of our magazine!


What did you think of the flower tutorial??? Easy, peasey, right? Well here is a flower I made and I used it as an embellishment on a mini book. 


Here is a picture of the mini book


And here is a closeup of the flower! 


If you decide to make a flower or two, I would love to see them!!!! Just make a post linking back to my blog so I can see them!!! 


Now, don't forget I gave you a sneak peek in  my last post about my color challenge project. Did you guess what it was??? No??? If not, here is the completed project for you to see. But guess what??? I am the sponsor for this month's color challenge!!!! That means you get $25 in product from me from Close to My Heart. The colors for this month's challenge are Red, White and Blue in honor of Independence Day. You can make ANYTHING you want as long as you use these colors and as long as it is a new project. You can link back to A Homespun Affair for a chance to win. Make sure you follow ALL the rules for entry! We don't want anyone to be disqualified! And now on to the project!


I used a 12" wreath from Michael's. I wrapped in it red ribbon. The flowers were cut at 3" and 5" from the Cricut Art Philosophy cart EXCLUSIVE to Close to My Heart. If you want to purchase this fabulous cartridge, you can purchase it HERE. I used hot glue to affix some white stringed pearls in between the flowers. I also added a white ribbon. So if you want to make a project using the colors, don't forget to link your project. You have until July 23rd to do so!!!

Thanks for stopping by!!!!

~Tiffany AHA Design Team~

Monday, May 28, 2012

Design team call for May Arts Ribbon


Hi everyone!!! Today this post is to announce my submission for the May Arts Ribbon Design Team. I'm really excited about this!!! I love using embellishments, especially ribbon in my projects and I think this design team is going to be a great fit for me!
These are my three submissions for the design team.


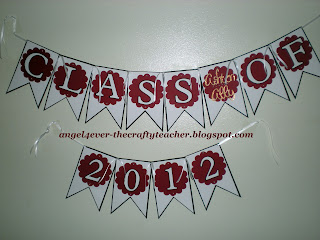
Submission 1 - Graduation Banner


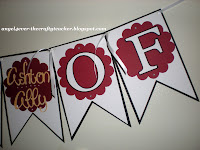
Here is a graduation banner I made using the Art Philosophy cartridge from Close to My Heart. I used ribbon to affix the letters together. 


Submission 2 - Altered Birdhouse 


This was an unfinished wooden birdhouse. I painted the base purple and adhered card stock to the roof using mod podge. I wrapped a black ribbon around the base and I tied a ribbon with a flower on the top. 


Submission 3--- TP Roll Mini Album - FOR MY TUTORIAL go here- TP Roll Tutorial

I had a lot of fun making this. As a teacher, I am always thinking of ways to use materials in different ways. This is the latest album I have created using tp rolls and ribbon. I threaded ribbon through the holes I punched to "bind" the book together. I also used ribbon to pull the tags out of the little "pockets". 


If you wish to learn how to make one of these, please see my tutorial by clicking this link...TP Roll Tutorial.


Thank you so much for stopping by! I am very excited about the possibility of joining this team and I'm looking forward to the challenge of incorporating ribbon more often in my projects!


~Tiffany~ 

Saturday, May 19, 2012

My Big Fat Wedding Blog Hop!

Hi and welcome to the My Big Fat Wedding Blog Hop!


Welcome to My Big Fat Wedding Blog Hop. We are a group of a talented ladies who love paper crafting (well most of us) and will be show casing Our Amazing Creations along they way.  If you are visiting from Jennifer http://cluelesscrafter-jennifer.blogspot.com/  then you are in the right place. If not, please go and start from the beginning at http://wwwpaperkraftsunlimiteddesings.blogspot.com
Blog Hop Giveaway is............ $10.00 Gift Card fom Ginger Snaps Scraps.


Here is what I came up with: Here is a little "flower girl" basket I made without even using my Cricut Expression. As much as I love my Expression, sometimes I just want to use some paper and make something quick! Well, it doesn't get any quicker than this!!!


I started out with a 12 x 12 piece of card stock and cut it down to 9 x 9. You will also need a one inch strip of contrasting paper for the handle.Score at three and six inches ----- but only score three inches down. Turn the paper 180 degrees and repeat.
Cut the score line. You are going to have what looks like flaps. Fold the flaps with a bone folder for a more crisp fold.
Using an ATG adhesive or a double sided tape, take two ends and bring them to one another with the third flap in the middle. The middle flap with fold up on the inside of the two flaps. Secure the end and then do the other side. Take the one inch strip and adhere it to the inside of the "basket". You can then embellish it. I used some pink ribbon and some flowers that I had in my stash. This little basket was sooo easy to make. It took less than 30 minutes from beginning to end!


The patterned paper came from Close to My Heart from the Sweetheart paper pack. If you want to purchase that paper or any of the other paper from CTMH, you can purchase it >>>>>HERE<<<<<


Since I am the last stop on the hop, I thought it would be nice to do a small giveaway! But it's a surprise!!! In order to be entered into the giveaway you must:
1. Become a follower of my blog!
2. Share the blog hop with on FB 3. Leave a comment stating you shared this!


Winners will be selected on Friday May 25th using Random Number generator.
I hope that I have inspired you yo become more crafty!!!


~Tiffany~

Tuesday, May 15, 2012

Random projects!

Hi everyone!!!  I just thought that I would post some random projects that I have completed in the last couple months! Enjoy!!! ♥